
Alright, so I love New York City. Like, a LOT. It’s my favorite city in the US, and any time I get an opportunity to shoot there I have to resist the urge to jump up and down squealing! Who am I kidding? I don’t resist that urge- I EMBRACE IT.
Anyways. So while New York is amazing, she also has her infuriating quirks like traffic, which can result in a serious delay in getting from point A to B during a shoot. Chris & Shan’s Anniversary Experience session last week was INCREDIBLE, but due to an unfortunate circumstance of us getting into a cab with a driver who was literally on his FIRST day on the job (AKA he had no idea how to drive in New York), it took 35 minutes to get from Grand Central to Central Park. By the time we arrived, it was 6:15, and sunset was at 6:24. I panicked a bit, being in my favorite location and only having NINE minutes of light left, but having shot in Central Park in the past after sunset, I knew there were a couple of tricks I could pull out in order to capture those romantic portraits I’m known for!
So! Here are a few tips for how to keep shooting even when your light is fading fast!
*Note that I’m shooting on manual mode, so all of these settings are set by me, not my camera. I recommend manual mode in this situation, just because your camera’s auto settings probably aren’t going to be accurate enough to get what you need!*
1) Throw your aperture WIDE open! I shoot portraits exclusively with prime lenses because I love that soft, creamy bokeh produced at 1.2-2.0. Typically, if I’m shooting with my 85mm 1.2 lens, I’ll sit around 2.0, but if it’s getting dark and I need more light, I’ll open my aperture allll the way. My 50mm 1.2 offers the same option! I know some folks favor lenses like the 24-70 or 70-200 for it’s versatility in zoom, but in a low light situation, f/2.8 just isn’t going to be enough for me.
Settings: 1/100, f/1.6, ISO 1250
2) Jack up your ISO. I usually try to shoot with my ISO between 200-800 during normal lighting situations, whatever helps me keep my shutter speed to 1/125 or faster. Why is that important? Because typically, my subjects are moving in one way or another during their session, and in general, 1/125 is as slow as I’ll go in order to avoid motion blur.
When I’m losing light and I need to boost my ISO, I’ll take my shutter speed as slow as I can afford, open up my aperture, and then just keep upping my ISO until it’s where I need it to be. Because of how quickly the light fades after sunset, this means I’m constantly adjusting my settings- everything couple of minutes, I up my ISO again.
Settings: 1/80, f/1.6, ISO 3200
Does this mean my images can sometimes end up a bit grainy? Yep! But I actually LOVE that! Grainy images at dusk are so romantic! But photographers, this means you need a camera body that performs well in low light situations. The 5dmk3 is AWESOME when it comes to higher ISO, but I remember when I was still shooting Nikon that pushing my D300s anywhere past 1600 meant my images were painfully grainy.
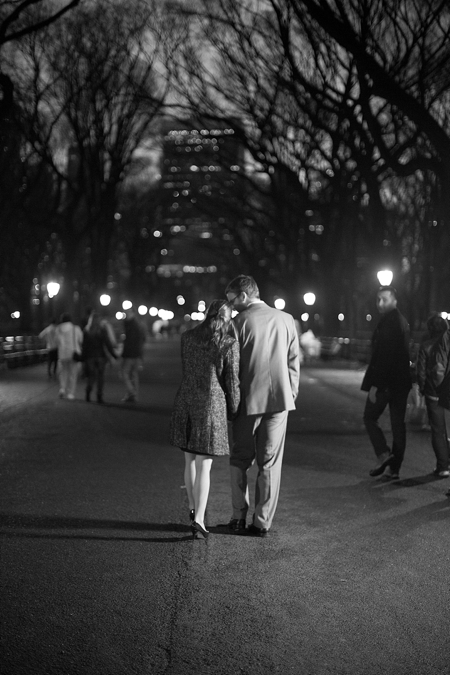
3) Use any ambient light you can find. In New York or DC, this often comes in the form of streetlights. (Streeeeetlights! Peeeeeopaaaaaaalle!!! Anyone?) Nighttime portraits using only a streetlamp are some of my all-time favorites- reminding me of James Dean, Audrey Hepburn, that classic city feel. Make sure you’re adjusting your white balance as you go, though- streetlamps tend to run REALLY warm/yellow, so if you’re not careful, your subjects might look like a cat peed on your memory card.
This portrait was shot using ONLY the light from surround street lamps- Central Park is (fortunately) pretty well-lit, and with the cross lighting from lamps on either side of the street, I placed Chris & Shan where the paths of two beams of light came together. Then you have the spotlights on the trees in the background and the windows in the building in the distance adding two more layers of dimension!
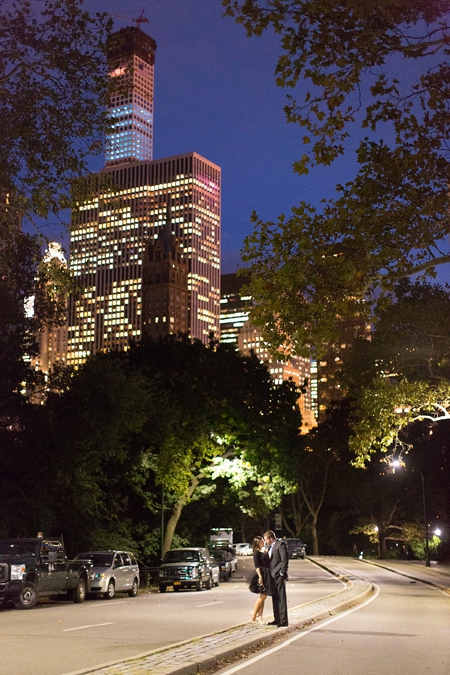
Settings: 1/160, f/1.6, ISO 6400
4) If it’s an option, switch to a shorter lens. I couldn’t give you the scientific reasoning as to why, but I do know that my 85 1.2 means my shutter speed needs to slow a little when compared to my 50 1.2 because of the longer focal length. So when it’s starting to get dark, I make sure my 50mm is on my camera instead of my 85. If you favor the 35 1.4, that’s also a great option!
5) If need be, convert to B&W. To clarify, my after-dark B&Ws aren’t mistakes, I’m PLANNING to convert them as I’m shooting the images. But if you have an after-dusk image that you love and the color is super wonky from mixed lighting, converting to B&W can allow you to save the image without losing sleep over strange skin tones. This is a last-resort situation, I definitely don’t promote slapping any poorly-lit image into B&W as an excuse to shoot lazily.
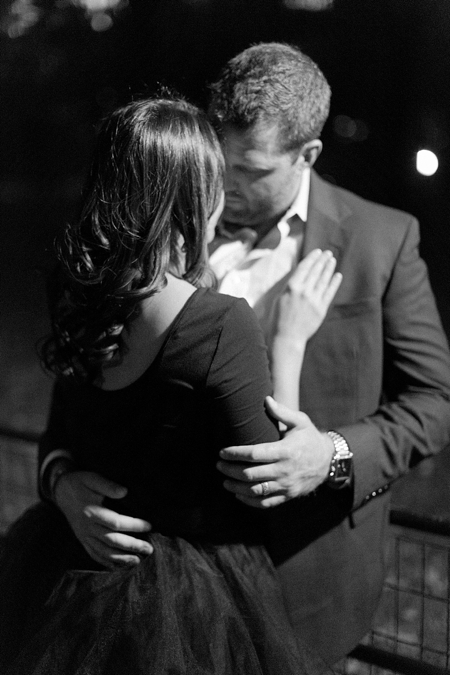
Settings: 1/200, f/1.6, ISO 6400
6) If it’s an option, have an external light with you. If I’m shooting without an assistant, then chances are I won’t exercise this option because it’s a LOT to lug around my camera, Kelly Moore bag, PLUS a light stand + soft box. But if I have Matt with me, it’s much simpler! Last December we did exactly that with Corey + Kelsey’s Anniversary Experience session, and I just loved how the images turned out!
Hopefully that was helpful! Feel free to leave any questions/comments/additional advice in the comment section!
Lessons Learned: What to do when you’re losing light FAST!
October 16, 2014
Follow along
@abbygracephoto
info@abbygracephotography.com
WASHINGTON, DC & WORLDWIDE
DESIGN BY TONIC SITE SHOP
© ABBY GRACE PHOTOGRAPHY 2024
Back to top

I LOVE these images!!!! Awesome advice, too. 😀
Great advice abby!
Your grasp of all things photographic amazes me!
Great advice! Streetlamps have saved me on many an occasion that my couples were running late to an engagement session and pushed it into the darker end of sunset!
Add another page to my learnings, thanks a bunch for sharing with those of us that haven’t been doing it as long or as well! You’re the best!